
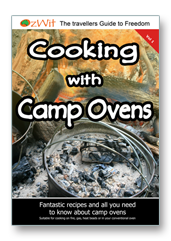
 You just can’t beat sitting around a campfire at night and cooking up a nourishing meal, and what better way to do it than in a camp oven. OzWit has two books that will just tantalise your taste buds, "Cooking with Camp Ovens" and "Fair Dinkum Dampers".
CAMP OVENS
have been used in Australia by drovers, shearers and bushman on the move and by miners during the days of the gold rush. This type of cooking has definite advantages. Droving camps in a bygone era came up with the idea of making a spun steel camp oven. This became the famous Bedourie Camp Oven named after the town Bedourie out in the Diamantina area in the out back of Queensland. The town started in the 1880's as a major water hole and rest stop for drovers and cattle because of the artesian bore.
SPUN STEEL CAMP OVEN
OzWit have been using the spun steel Camp Oven since 2007 when their existing cast iron camp ovens were replaced due the the 12kgs of weight whilst travelling Australia. Two spun steel camp oven in different sizes which fit inside each other replaced the old ones, accessories and one single carry bag now weighing in less than 8kgs. The ease of use and being able to throw them in the back of a ute and not have to worry if they will crack if they jump around. Quick clean up by using cold water in a hot camp oven means we can move on quickly, unheard of using the traditional cast iron camp oven. Yes, it took us a while to learn to regulate the heat using the spun steel camp oven, but find it easier to regulate the heat, easier to clean, a lot less weight and compact and versatile because the lid is also your frypan.
Whether you are using an old bushies cast iron camp oven, or a new spun steel camp oven, there are a few techniques and tips to help you perfect your cooking. To view our camp oven products click HERE.
Camp Oven Tools
- Heat resistant gloves or oven mitt so you don’t burn your hands.
- Long handled BBQ tools, so you don’t burn your hands.
- Camp Oven Lifter or Tent Peg puller works for lifting lid and checking on food, required for all cast iron ovens.
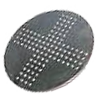
- A trivet for bottom of camp oven to cook damper/scones/cakes. Check out OzWit’s STORE for a great buy on the best trivet you can buy!
- Bread/cake/muffin tin/tray to place ingredients on top of trivet.
- A small whisk broom (horse hair - not nylon) to remove the ashes from the lid, required for most cast iron ovens.
- Roasting meat thermometer gauge.
- High Rack for cooking Pizza.
|
|
Long Handled tools |
Lifter |
|
Temperature Gauge |
Horse Hair Brush |
Trivet |


HOW TO SEASON YOUR CAMP OVEN
- Remove any stickers and manufacturing oils with hot water and a scourer or stiff brush, not hard wire. After you have cleaned it you need to dry it thoroughly.
- Cast Iron camp ovens are porous and have to be treated to seal the surface. It's not a good idea to use detergents in cast iron ovens as the suds enter the pores of the cast and you may have the lingering taste of soap in your meals.
- If you are preparing a spun steel oven its ok to use mild soapy during the initial seasoning process
- Wipe the inside and outside and lid of the camp oven, cast or spun steel, with rice branoil preferably as it burns at a higher temperature than vegetable and olive oils, Coconut oil is also a great alternative.
- Place your camp oven in a moderate to high temperature oven 200°C for until totally heated with lid on then let it cool. Depending on your circumstances, you could use your oven at home as described above, but make sure you open all your windows and doors as it will get a little smokey. Hot coals from a fire, gas bbq with a dome lid or a webber bbq with dome lid work well.
- Repeat the oiling and heating process for the oven to obtain a desired uniform colour. This process will stop rust forming and make your camp oven easier to clean up after use.
PREPARING YOUR FIREPLACE FOR YOUR CAMP OVEN
Separate hole method
Dig a hole a bit larger than the size of your camp oven to the side of the fireplace; this will prevent the heat from your main fire burning your damper.
Get a good campfire going with the aim to end up with lots of red hot coals. Utilising hardwood will ensure that the heat will stay at a constant temperature. Most of you will know that pine heats up quickly and then fizzles out, so be mindful of this. It may take a few hours or so to produce the required amount of red hot coals.
Make sure to preheat your camp oven hole with lots of hot coals but then some coals should be removed before cooking as we use fewer coals for the cooking process.
We prefer to spread the coals in the bottom of the hole evenly, but you don’t need too many as you only want to warm the bottom of the oven. This way is best if you find yourself in windy conditions. Wind can stir up the coals and increase the temperature, resulting in a camp oven cooking too quickly, causing evaporation of liquids inside.
Beside the fire method
OzWit would use this method if we are camping on sandy or rocky ground. If you have still conditions, you can place a large shovel of coals to the side of your fire, a bit larger than the base of your camp oven. Position the camp oven straight on top of the coals. Be sure to rotate your camp oven periodically to prevent your food burning and hot spots occurring.
Cooking a camp oven with heat beads
The good thing about heat beads is that they evenly distribute the heat well.
This is a good method if you cannot have a fire, or you are not confident how many coals to put under and on top of your camp oven, or if you are beginner.
Heat Beads® BBQ Briquettes are the best and available in 4kg, and economical 10kg bags for frequent users.
Some set-ups and a few options as to what you can cook it in:-
- inside a cobb oven sitting on some stainless steel gauze/trivet
- inside a half 18 gallon keg on some stainless steel gauze/trivet
- between two bricks on a stainless steel plate
- a special designed camp oven fire holder
- We recommend using a heat bead starter to get the heat beads going, its a sure thing!
Place your three fire lighters at the bottom of a fire starter of what some call a Heat Bead Starter or some bushies would use a paint tin with the bottom cut out at the bottom and holes drilled into the sides. Then put your heat beads over the top and leave for 30 minutes until they have ashed over or turned grey.
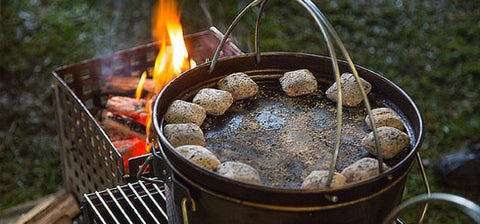
The photo above depicts a typical set-up we use at home on the weekend when we want to cook a camp oven. A small base holding heat beads to distribute heat to the bottom of the camp oven and heat beads on the lid to distribute the heat to the top, makes it possible to be able to cook anywhere and at any time. So, don't wait til you go on your camping trips, starting using your equipment at home and enjoy those beautiful flavours without heating up your kitchen and invite a few friends over to smell the aroma and enjoy it with you.
How many heat beads do you use for a camp oven?
As a guide, for Cast Iron camp ovens we recommend twice the number of Heat Beads® briquettes as the diameter (in inches) of the camp oven. Generally, we like to cook everything at a constant 180°C (or 350°F). for Spun Steel camp ovens 9 on the bottom and 9 on the top will heat this camp oven to about 200°C for approximatley 90minutes.
As a general rule anything that needs to rise, like pizza, damper, cakes or pudding you put more on the top than the bottom, as you want the heat at the top.
If you are cooking a roast with veg in a camp oven we would use double the number of the size of your camp oven. For example we use a 12” camp oven, so we would use 24 Heat Beads® BBQ Briquettes, 10 on the bottom and 14 on the top.
If you are cooking a basic plain damper in a camp oven we would use 12 Heat Beads® BBQ Briquettes in total, 4 on the bottom and 8 on the top.
If you are cooking a stuffed damper in a camp oven we would use 16 Heat Beads® BBQ Briquettes in total, 6 on the bottom and 10 on the top. If you wanted to cook it quicker and you used a trivet and a baking tray you could use 24 Heat Beads® BBQ Briquettes, 9 on the bottom and 15 on the top. You would need to check to see that it is not burning.
If you are cooking a stew or pot roast in a camp oven we would use 18 Heat Beads® BBQ Briquettes in total, 8 on the bottom and 10 on the top.
If you are cooking a pizza in a camp oven we would use 12 Heat Beads® BBQ Briquettes in total, 4 on the bottom and 8 on the top.
If you are cooking a pie in a camp oven we would use 12 Heat Beads® BBQ Briquettes in total, 4 on the bottom and 8 on the top.
Thank you to our sponsor Auschar Pty Ltd. Their Heat Beads® BBQ Briquettes product is the best we have used.
Cleaning your camp oven
Simply scrape out the remaining food and clean the oven with hot water and a natural fibre brush and allow to completely dry by sitting it near the fire or the sun.
DO NOT use detergents or soap.
Storing your camp oven
To store your camp oven, lightly oil all surfaces and store in a dry place with the lid ajar (if possible). The seasoning will improve with each use. It's a good idea to purchase a heavy duty canvas bag with handles to carry your camp oven in. Check out OzWit’s STORE for a great buy on the best camp oven bags you can buy!
- You should NEVER pour cold water into a hot cast iron camp oven as it may crack.
- You should NEVER drop a hot cast iron camp oven as it may crack.
- With spun steel camp ovens you do not have to worry about this, they do not crack under these circumstances.
As many destinations in Australia are remote, access to good quality fresh bread is difficult. We found it invaluable to take bread mix or plain flour and yeast to bake our own bread in the camp oven.
Recipes in OzWit's "Cooking with Camp Ovens" book include:
Cheese and Bacon Damper
Parmesan and Chive Twists
Seafood Parcels
Prawn Toast
Marinated Squid
Garlic Butter Scallops
Beer Battered Prawns or Fish
Mussels in Garlic and White Wine
Maple and Pear Glaze
Peppercorn and Cream Sauce
Mint Sauce
Orange and White Wine Sauce
Apple Sauce
Mustard Sauce
Creamy Mushroom Sauce
Zesty Prawn and Garlic Sauce
Chicken and Mushroom Pie
Honey Lamb Pie
Sweet Corned Beef and Vegetables
Roast Chicken
Chicken Pesto Pizza
Sweet Chilli Prawn Pizza
Roast Pork
Slow Cooked Lamb Shanks
Honey Roasted Lamb Shanks
Bushman Curried Sausages
Lamb and Apricot Pot Roast
Chicken and White Wine Pot Roast
Beef Pot Roast
Moroccan Lamb Pot Roast
Greek Lamb Pot Roast
Beef, Beer and Barley
Chicken Korma
Lamb Curry
Pork and Beer Pot Roast
Chilli Beef with Beans
Pork with Apple and Bourbon Sauce
Infused Snapper with Mango,
Cucumber and Chilli Salsa
Grilled Tuna with Honey Mustard
Infused Mud Crabs
Lemon and Ginger Whole Bream
Infused Salmon with Pesto
Seafood Hot Pot
Prawn Omelette
Banana Cake
Lemonade Scones
Peach and Pecan Pudding
Tropical Delight
White Chocolate Lava Cake
Chocolate Lava Cake